
Quick installation guide for Websydian Express for Windows with an System i back-end
This guide provides everything you need to do in order to install Websydian Express for Windows with an System i back-end, quickly.
Step 1: Check prerequisites
System i
- OS/400 version V5R1 or later
- Latest Cumulative PTF package
- FTP Server configured on System i
Servlet Engine
A servlet engine is required to run the Websydian Express Web Server Component (Web Server Component).
For System i we recommend installing WebSphere Express for System i.
If planning on deploying the Websydian Express Web Server Component on Windows we recommend installing the Apache Tomcat servlet engine.
Windows
This version of Websydian Express requires Microsoft Windows 2000 Pro/Server, XP Home/Pro or Windows 2003 server.
The installation program also requires a connection to the System i using either FTP or Client Access.
Step 2: Obtain the latest version of the Websydian Express for Windows/System i installation program
Current version and build is "Websydian Express v2.0 (#71001) for Windows/System i"

Step 3: Install the Websydian Express components
Before continuing make sure that you have installed a Tomcat servlet engine on your system or have access to a servlet engine.
- Start the Websydian Express install shield Express_v20_WinSystemI.exe. At any point during the installation feel free to press a Help button if you need further information
- On the 'Welcome' page press Next
- Press Next to accept the location used on your PC for objects required during installation
- Read and accept the SUN license agreement and press Next
- Read and accept the Websydian license agreement and press Next
- On the 'System i Information' page enter the following information and
press Next
- System i host name, enter the host name or IP address of your System i
- User name, enter the user profile to be used for uploading objects to your System i
- Password, enter the password of the user profile
- System i code page, select the codepage used by your System i
- Plex Dispatcher TCP Port, enter the TCP Port to be used by the Plex dispatcher
- Press Next to accept default URL information for accessing Websydian Express
- On the 'Regional Settings' page choose the formats you want and pres Next
- Press Next to accept the default settings used to start the Websydian Server
- Press Next to accept the default settings used to start the Application Services
- Press Next to accept the default settings for deployment of the Websydian Web Server Component Servlet
- Press Install to start installation
Note! During installation you will be prompted to accept deployment of the Websydian Web Server Component to your Tomcat, pres Yes
The last step performed by the installation program is the transfer of required objects to your System i, this can be a long running task, please be patient
Step 4: Run System i installation program
- Using Client Access logon to your System i with a user profile that has the authority to restore objects and create libraries and objects.
- On the command line run the command call qcmd followed by pressing the F11
- Add the library WXPW20INST to your library list using the command addlible
- Copy and paste the "System i Command" lines from the dialog "Transfer complete" to the command line of your Client Access.
- Execute the command WXPINST by pressing enter
Note! The installation process can be a long running task, please wait. - Use the command dspjoblog to verify that the installation process completed successfully. Stated with the text 'Installation Successful'
Step 5: Manual deployment of the Websydian Web Server Component
- Locate the WAR file referenced in the Web Server Configuration dialog on the Transfer Complete dialog.
- Deploy the express20.war file to your servlet engine following the
information in the manual of the servlet engine.
Context root of the servlet should read express20
Step 6: Start the System i Plex Dispatcher on your System i
If you have not all ready started an System i Plex Dispatcher on your System i, please follow these steps.
The System i Plex Dispatcher objects are located in the Websydian Express program library, default named WXPW20PGM.
- Create a new user account named YOBSYDIAN
This user profile will be used to start the System i Plex Dispatcher. - Make sure that the newly created user have the following authorization
- *USE authority for each System i user profile that will be initiating a client connection request.
- *USE authority for the objects QSYS/QSYGETPH and QSYS/QSYRLSPH
- If running V5R3 or later run the following commands
- RNMOBJ OBJ(WXPW20PGM/YOBSYCDPDP) OBJTYPE(*PGM) NEWOBJ(XYOBSYTCPDP)
- RNMOBJ OBJ(WXPW20PGM/VOBSYTCPDP) OBJTYPE(*PGM) NEWOBJ(YOBSYTCPDP)
- To start the System i Plex Dispatcher run the following command
- SBMJOB CMD(CALL (PGM(WXPW20PGM/YOBSYTCPDP) PARM('port_number'))
JOB(YOBLISTEN) JOBD(WXPW20DB/EXPRESS) JOBQ(QGPL/QINTER) USER(YOBSYDIAN)
Where port_number is replaced by the port selected on the "System i information dialog" during installation, default is 3856
Location of program and job description might be different from the default settings, if in doubt check the InstallFinish.htm document for information on the installation.
- SBMJOB CMD(CALL (PGM(WXPW20PGM/YOBSYTCPDP) PARM('port_number'))
JOB(YOBLISTEN) JOBD(WXPW20DB/EXPRESS) JOBQ(QGPL/QINTER) USER(YOBSYDIAN)
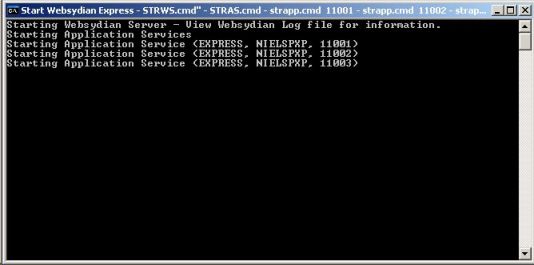
Step 7: Start Websydian Express
In order to start the Websydian Express select the menu short cut "Start Websydian Express" under the Websydian -> Websydian Express v2.0 for Windows and System i sub menu.
Please note when starting Websydian Express for the first time you will be asked to enter user and password for the System i connection. Make sure that you save user and password settings by checking the required check boxes.
.
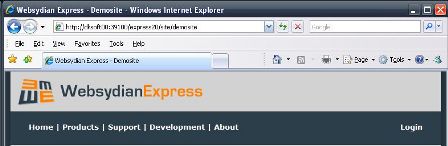
Step 8: Access the Websydian Express demosite and administration interface
http://<YourHostName>/express20/site/demosite
Make sure that you replace the '<YourHostName>' with the host name of your computer
Login with user Customer and password Customer to login to one of the sites and access the administration interface.
The web address used in this example is based on the default settings used by the installation program.
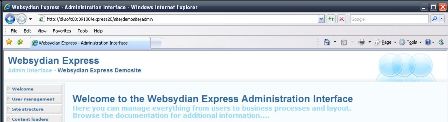
In order to access the administration part of the demosite append /admin to the url
http://<YourHostName>/express20/site/demosite/admin
Make sure that you replace the '<YourHostName>' with the host name of your computer
Login with user WSADMIN and password ADMIN in order to access the administration interface of the demosite.
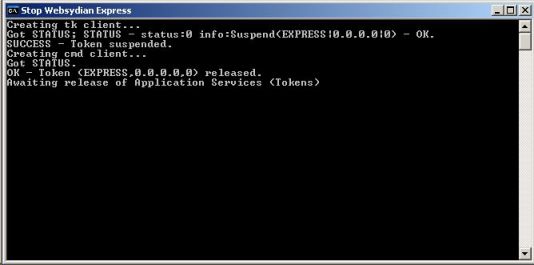
Stopping Websydian Express
In order to start the Websydian Express select the menu short cut "Stop Websydian Express" under the Websydian -> Websydian Express v2.0 for Windows and System i sub menu.
.
Obtain a license for the Websydian Server
By default the Websydian Express is installed with an unregistered license of the Websydian Server providing 10 concurrent sessions.
You have the option to obtain a registered version for 10 concurrent sessions for free that enables you to find a starting point on the number of concurrent sessions required by your applications.
For pricing on concurrent sessions please contact info@websydian.com.
Uninstalling the Websydian Express
The following are the steps to complete in order to completely remove Websydian Express v2.0 for Windows from your system
- In the Tomcat directory locate the webapps directory and remove the express20.war file
- In the program files directory locate the directory Websydian and delete the directory named "Express v2.0 for Windows and System i"
- On you System i locate and delete the libraries WXPW20*
roubleshooting Websydian Express Installation
If you are having problems installing Websydian Express please contact Websydian support at support@websydian.com and attach the following information:
- The InstallFinish.htm document generated by the installation program.
- The Websydian Server log file.
To locate the Websydian Server log file go to the directory where you installed the Websydian Express, and open the subdirectory Websydian Server\logs. - The Web Server Component log file, which is located on your web server in the
directory specified during installation.
To locate your Web Server Component log file open the InstallFinish.htm document, go to the "configuration sheet" section and locate the value for "Web Server Component Log file".